

Are you having difficulties connecting your Shopify store with Facebook? You are not alone. Many store owners face issues in the Shopify Facebook integration process. That’s because there are multiple steps to follow, different accounts to connect, and merchants often get confused or stuck midway.
However, while the process seems complex and overwhelming, it isn’t in reality. At least not when you are following the right steps with proper guidance. And to help you avoid facing any hurdles and learn how to connect Shopify to Facebook, we have created this blog.
Through this guide, we will discuss:
- Different methods that help connect Shopify to Facebook
- The benefits of connecting your Shopify store with Facebook, such as broader reach, centralized management, etc.
- The detailed step-by-step process of the integration for each method
- Best practices to follow
So, are you ready? Let’s start.
Table of Contents
Methods to Integrate Shopify with Facebook
There are basically four different and prominent ways to integrate your Shopify store with Facebook. These include:
- By using the Facebook and Instagram (native sales channel) app by Meta, available on the Shopify app store.
- Using third-party Shopify Facebook feed apps like ‘Nabu for Facebook feed.’
- Leveraging Shopify Facebook pixel apps like ‘Facebook Pixels by AdNabu.’
- Using APIs manually.
Below, we will be discussing all of them in detail.
1. Facebook and Instagram app by Meta
Before we dive into the step-by-step process of using the sales channel to create a connection between your Shopify store and Facebook, there are certain prerequisites that you must meet. Those include:
- You should have a Shopify online store that is not password-protected.
- You must be on the basic or higher plan of Shopify
- There should be a valid sender email address for your Shopify store
- You should have a Facebook account. If you don’t have one, then once you install the sales channel app, you will be prompted to create it.
- Your business should also have a Facebook business page and a business portfolio that is connected to that page.
- A Facebook ad account that is connected to your business portfolio (if you want to run ads)
- Compliance with all the Meta Commerce Eligibility requirements.
- Products that meet Meta’s Commerce Policy requirements and Advertising Standards.
| Note: The list of prerequisites shared above isn’t exhaustive. For more information, check this Shopify help article. |
Step-by-Step Process
- Start by installing the ‘Facebook & Instagram’ app from the Shopify app store.

- Connect your Facebook account. To facilitate that, click on the ‘Connect account’ button.

- You will then be taken to the Facebook login page, where you will have to enter your credentials and log in.
- Shopify will request access to certain basic details of your account, such as name and picture. Grant those permissions to continue further with the Shopify Facebook integration process.

- Then, select a setup from ‘Shop and ads’ and ‘Ads only.’ You can decide on any one by reviewing the product comparison chart available in the Facebook and Instagram app. However, as a best practice, we recommend choosing ‘Shops and ads.’ That’s because, as the chart shows, it offers access to more social commerce features, such as:
- Website and Shop campaigns
- Facebook and Instagram Shops
- Shop insights and analytics
- Product tagging

- Then, you must configure several settings and follow the app prompts to finish the integration. You will have to:
- Go through the recommendations for preparing your accounts for the setup. Click on ‘Next’ when done.

- Review the Facebook account that we connected earlier, after installing the sales channel app. Moreover, it is during this stage you can also disconnect it and link a different account if needed.

- Select the business assets you want to connect to sell from your shop. If you wish to create a new Facebook page to connect with the app, you can click on the ‘Create new’ button. You will be redirected to Facebook, where you can complete the process.

- In the next step, select your data sharing preferences. You can select from ‘Conservative’, ‘Enhanced’, or ‘Maximum’ (recommended). These options determine how customer activity data is shared ahead with Meta’s systems using tools like the Meta Pixel and Conversions API. Facebook then uses this data to optimize the delivery and performance of your ad campaigns.

- Select or create a Facebook pixel.
- Configure business details. This would include your contact information, such as your email ID. Also, specify a return window for your customers. Once done, click on ‘Save.’

- Read Meta’s seller agreement, check the box, and click on ‘Submit for review.’

The setup process will be completed, and the sales channel app will just take a few minutes to finalize it. During that period, you shouldn’t refresh the page. Once the setup is completed, your Shopify store will be connected to your Facebook account.
After that, you can easily start publishing your Shopify products across Facebook (and Instagram). All you will need to do is:
- Make your products available to the sales channel.
- Publish your products to Facebook and Instagram within the sales channel app.
- Review their status in the app to confirm if your items are active. At the same time, you should also check if your Shopify products have been properly synced to Meta Commerce Manager.
| Note: To learn more in detail about how to connect Shopify to Facebook using the sales channel app and how to publish products, read these resources: 1. Setting up Facebook and Instagram by Meta 2. Publishing products on Facebook and Instagram by Meta |
In addition to allowing you to sync your products, the app will also allow you direct and easy access to Facebook’s marketing tools and social commerce features. From your Shopify dashboard, you can click on any option like ‘Create ad’ or ‘Customize shop’, and you will be taken to the corresponding Facebook page. So, in a way, the integration makes it easier to create and manage Facebook ads, shops, etc, without switching between multiple tabs and platforms.
2. Using Third-Party Shopify Facebook Feed Apps (Nabu for Facebook Feed)
The native sales channel app is one method to connect your Shopify store to Facebook. However, there are some limitations of using the app, such as:
- Often, users report data discrepancies between Shopify and Facebook or failed syncs, which lead to delays in launching their ads.
- It doesn’t offer other features, such as the ability to optimize your feeds for better visibility via ads, etc.
Due to these reasons, you may want to use a third-party Shopify app that offers more control and reliability. The good news is that such apps exist, and one great example is Nabu for the Facebook feed.
It allows you to:
- Seamlessly connect your Shopify store with Facebook (and also Instagram).
- Edit your Shopify products as per Facebook’s product feed specifications.
- ‘Opt in’ or ‘Opt out’ products from your Facebook catalog as per your needs.
- Accurately sync all the product data to Meta Commerce Manager.
So, let’s quickly learn how to set up the app and leverage its capabilities to connect both platforms, enhance your Facebook product feeds, and boost advertising efforts.
But, before we move to the step-by-step process, there are some requirements that your store and business must meet. They include:
- A published Shopify store with a custom domain (for example, sample.com). Remember, stores using the default myshopify.com URLs will not be eligible for setting up our app and moving ahead with the integration.
- A Facebook business manager account.
- Your Shopify store should be publicly accessible.
- Products should be published in your Shopify store with valid product attributes such as title, descriptions, availability, price, etc.
- Active and accurate policy (such as refund, privacy, and terms of service) and contact pages
- Valid shipping information for the country of sale for your Shopify store.
Step-by-Step Process
- Install the app from the Shopify app store.

- Connect your Facebook account.

- Choose whether you would want the app to access either:
- All your current and future businesses
- Only your current business

- Review the app’s access request and save it.

- You will get a confirmation that your Facebook account has been connected to the app. This successfully completes the Shopify Facebook integration process.

| Note: You can manage this connection easily within your Facebook account’s business integrations page. |
- After that, within the Nabu for Facebook feed app, you will just need to:
- Complete the feed setup part
- Add your contact details
- Answer some basic questions like the basic purpose for using the app, if you are dropshipping products, etc.
- And click on Continue.

- Then the app will download your Shopify product data into its own interface.

- Once that is completed, the entire integration process will be complete. Further, as per your requirements, you can customize products, opt them in or out of your catalog, and sync data instantaneously to Meta Commerce Manager!
Install AdNabu’s Facebook Pixel App to easily create
Meta Pixels, enable Conversions API, and unlock advanced tracking for your Shopify store.

3. Using Shopify Facebook Pixel Apps (Facebook Pixels by AdNabu)
Before we understand how to set up a Shopify Facebook Pixel app to facilitate Shopify Facebook integration, let’s first understand how these apps help.
When you install a Shopify Facebook pixel app, it first allows you to connect your store to your Facebook account. After that, you can easily create pixels for that particular Facebook account and:
- Send conversion tracking data of your Shopify store to Meta’s systems, which can further be used for optimizing ads
- Add items from your store to your Facebook catalogue automatically
| 💡A catalogue is a container that includes all those products and their data that you want to market across Facebook and Instagram. |
So, using these apps’ dual functionality, you can easily sync your store data to Facebook, track customer behavior, and better optimize your ad campaigns.
With that, let’s learn how to integrate Shopify and Facebook using a third-party Facebook Pixel app. Also, for this blog’s context, we will cover the setup and integration process for the ‘Facebook Pixels by AdNabu’ app.
Step-by-Step Process
- Install the app from the Shopify app store.
- Connect your Facebook account.
| Note: The Facebook pixels by AdNabu app also allows you to add and manage pixels without connecting your Facebook account. However, in this blog, our discussion concerns the connection between both platforms. Thus, adding your Facebook account is essential during the setup process. |
- The app will request access to certain basic details such as your Name, profile picture, email address, etc. Grant those permissions.
- Once connected, you will have to select a business account. Also, during this stage, you can select an existing pixel from your Facebook account. And if you don’t have one, the app allows you to create a new Facebook pixel as well.
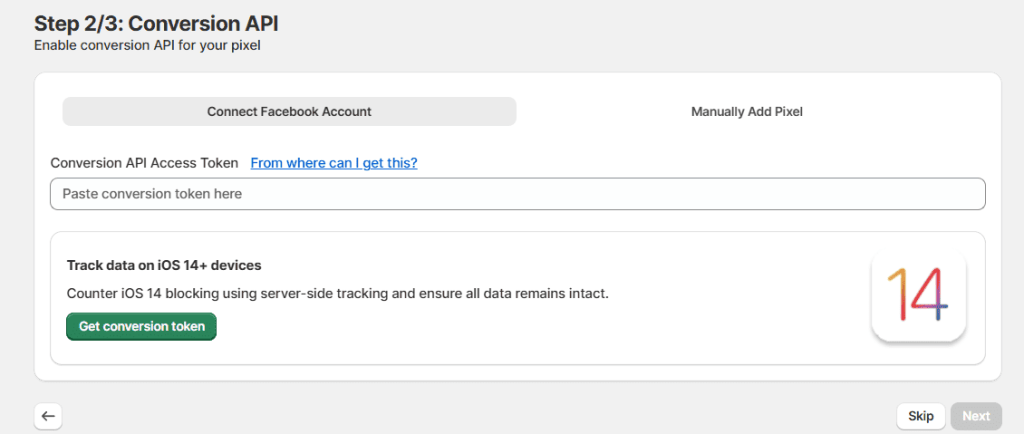
5. If you have a Conversion API access token, you need to add it. This article explains where to find that token. While it’s recommended to add one, if you don’t have it, you can skip and move ahead.
6. Enable Advanced matching and select the events you want to track.
7. Select a pricing plan.
8. That’s it. The setup and integration will be completed.
With the process above:
- Your Shopify store will be connected to Facebook.
- A Facebook pixel will be created that you can easily view in your Meta Events Manager account.
Using the same newly created Facebook pixel, you can also add items to your catalogue on Meta Commerce Manager. The process is quite simple to follow and includes steps in the following order:
- Go to your ‘Meta Commerce Manager’ account.
- Select the relevant ‘Business portfolio’, ‘Shop’, and ‘Catalogue.’

- Go to ‘Catalogue’ and click on ‘Data sources.’

- Click on ‘Add products’ from the top right corner.
- Select ‘Pixel.’
- Select the ID of the pixel that we created earlier in AdNabu’s Facebook pixel app. Click on ‘Next.’
- If required add filters to the pixel. Then, add the link to your Shopify store when Meta asks you to add a trusted website for your store.
- And that’s it. Meta will initiate the process to add items from your store. The process will take some time, and to check the progress, you can click on ‘View data sources.’

| Note: To add items to your catalogue using pixels, you must meet certain prerequisites. Read about those here on this Meta help page. |
4. Manual API Integration
Instead of using a native or third-party Shopify Facebook integration app, you can also manually use APIs to connect your store to Facebook.
In this method, you will first have to set up a custom script in Node.js or Python. This script will help establish the connection between Shopify and Facebook. It will retrieve product data from Shopify via the Admin API and sync it to Facebook via the Catalog API. Moreover, using the same script, you can easily map attributes like product titles, descriptions, etc., to meet Facebook’s feed requirements.
This method will also allow you to set certain specific rules for handling updates, deletions, or new products.
However, remember using manual APIs may not be feasible for merchants who don’t have technical expertise. This is because this method will require ongoing management of authentication tokens, API calls, and error handling.
For most businesses, we will still emphasize that the smarter way to connect your store to Facebook would be either via a feed or pixel app.
Benefits of Connecting Your Shopify Store to Facebook
Before we discuss how to connect Shopify to Facebook, let’s understand the benefits of this integration.
- Wider Audience Reach: Over 64 million consumers use Facebook for Shopping. By syncing your Shopify products to it, you can market them directly to this massive audience, which can help boost your store’s visibility and sales.
- Better Advertising Opportunities: With Meta ads, you can promote items of your synced inventory in different ad formats across Facebook and even other platforms. Options like image, video, carousel, and collection ads enable you to display products in engaging ways to consumers and capture their attention and drive action.
Moreover, by leveraging the Meta Advantage+ product and feature suite you can target your products smarter and use your ad budget efficiently. This can help ensure that you get the best results from your advertising efforts.
- Access to Social Commerce Features: On Facebook, you get access to some valuable social commerce features like Shops, in-app checkouts, etc. Using these, you enable your customers to browse, add products to cart, and complete purchases without leaving the platform. Such seamless shopping experiences can help you boost conversions and drive more revenue for your business.
- Consolidated Management: Nowadays, many apps that facilitate the Shopify Facebook integration also allow easy access to Facebook features directly within their interface. This means that from your Shopify dashboard, you can click on options like ‘Create an Ad’ and you will be redirected to the Facebook page that helps you do this. Moreover, you also get a centralized view of your Facebook performance and sales analytics in Shopify.
This saves time, avoids switching between platforms, and helps you manage ads, shops, and data all in one place.

- Streamlined Feed Management: With both platforms integrated, it is easier to handle catalog updates without making changes across both of them. Shopify Facebook integration apps allow you to ensure that whenever you change your Shopify product data, it automatically reflects in your Facebook catalog.
- Access to Multiple Meta Properties: After connecting your Shopify store to Facebook, you also get access to other Meta platforms and properties, such as Instagram, WhatsApp, etc. That provides you with a great opportunity to expand your store and drive higher conversions.
Best Practices for Connecting Shopify to Facebook
Some best practices to follow while integrating your Shopify store with Facebook include:
- Maintain high-quality product data: If your feed has issues or violates any Facebook policy, even if the integration is successful, your products will be disapproved. Thus, right from the beginning, ensure that you add all product attributes such as titles, descriptions, etc., accurately and properly. Remember, high-quality product data will not only help with seamless approval but also boost your products’ visibility.
- Access to all accounts and assets: Ensure that before the integration, you have either admin or other high-level permissions to the Facebook Business Manager and other related accounts. This is to ensure that the connection is seamless and you don’t face any errors. Thus, confirm account ownership and roles in advance to avoid delays.
- Configure the Meta Pixel during the integration: Make sure you set up your Meta Pixel properly during the Shopify Facebook integration process. That will help you capture insights for important customer events and optimize your advertising strategy accordingly.
- Choose a Reliable Integration Software: Whether you select a feed solution or a Shopify Facebook pixel app, ensure that the tool is reliable and secure. It should be able to sync data from your store to Facebook accurately without frequent errors. Moreover, ensure that the app is regularly updated as per the changes in Meta and Shopify’s policies.
Conclusion and Key Takeaways
Connecting Shopify to Facebook is not as complicated as it looks. With the right setup and tools, you can streamline the integration process and easily expand your reach.
Some takeaways from this blog include:
- Integrating Shopify with Facebook helps you reach millions of buyers directly on the platform. You can run different types of product ads, such as Advantage+ catalogue, access social commerce features, and manage catalogs and analytics in one place.
- You can connect Shopify to Facebook in four ways: using the official Facebook & Instagram Shopify app, third-party Shopify Facebook feed or Facebook Pixel apps, and manually using APIs.
- The native sales channel app by Meta enables you to sync catalogs, publish products, and access analytics from your Shopify dashboard. However, some users have reported issues while using it, such as sync delays or discrepancies in reporting.
- Feed solutions like Nabu for Facebook feed take the integration one step further. They not only bridge the gap between the two platforms but also allow merchants to optimize their Facebook feed for enhanced visibility and sales.
- Facebook Pixel apps offer dual functionality in the Shopify Facebook integration process. They help you upload items to your catalogue, track customer actions on your store, and send that data to Meta for smarter ad optimization. One great solution to try is Facebook pixels by AdNabu.
- Manual API integration is also possible for those merchants who are proficient with coding and technical skills. By writing a custom script and making API calls, merchants can sync Shopify data with Facebook and set rules for updates. However, this method requires strong technical skills and regular maintenance.
- Some best practices to follow during the Shopify Facebook integration process include maintaining high-quality product data. Apart from that, ensure you have admin access to all required Facebook accounts and assets. Also, always choose a reliable integration tool.
Good luck!
FAQs
1. Can I link my Shopify to Facebook?
Yes. You can link Shopify to Facebook using different methods, such as using the native sales channel, third-party Shopify apps, etc.
2. Why can’t I connect my Facebook to Shopify?
You may not be able to connect Facebook to Shopify if you lack admin access, have an unpublished Facebook page, duplicate or outdated catalogs, browser conflicts, or if your page is already linked to another Shopify store. Unsupported products or failing to meet Meta’s Commerce Eligibility requirements can also block the connection.
Look for these issues in your setup and resolve them to complete the connection.
3. Can I sell on Facebook with Shopify?
Yes, you can sell on Facebook with Shopify. Once both platforms integrate with each other, you can sell your Shopify products via Facebook Shops. These shops act as online storefronts where customers can browse, explore, and buy products directly. You can create collections, feature items, and design a shopping experience that fits your brand. Shops also work with ads, allowing you to reach and target shoppers more effectively.
4. How do I connect Shopify to Instagram?
Install the Facebook & Instagram app in Shopify, connect your accounts, and sync products to Commerce Manager. Once approved, your catalog will be available for Instagram Shopping, allowing you to tag products in posts and stories.
5. Do I need coding skills to connect Shopify with Facebook?
No, coding is not needed for most apps. Coding is only required for manual API integration, which involves scripts, tokens, and API calls, and is suited for developers.
6. How much does connecting Shopify with Facebook cost?
The native Facebook and Instagram app, AdNabu’s Facebook Feed app, and AdNabu’s Pixel app are free to use. However, manual API integration can become expensive due to developer costs and ongoing maintenance.
7. What role does the Meta Pixel play in integration?
The Meta Pixel tracks customer actions like purchases or add-to-cart events on your Shopify store. This data is sent to Meta for ad targeting and optimization, helping you improve campaign performance and return on ad spend.
Check Out These Related Articles:


