

It’s time to invite the audience to your Shopify store through Facebook ads!
Whether you are a beginner or an expert, running Facebook ads for Shopify can sometimes be tricky, but it’s absolutely achievable with the right Facebook Ads campaign structure. Meta’s Dynamic Creative feature allows you to quickly generate ads using images, videos, carousels, and more — helping you test and find what works best for your audience.
We shall explore how the ads will help boost your business campaign and explain the two best ways to advertise your Shopify store through Facebook Ads. So, if you want to generate traffic and accelerate sales, this blog is for you.
Let’s get started.
Skip To The 2 Simple (+1 Bonus) Methods
How will running Facebook ads for Shopify help your online business?
Facebook is the third most used app in the world after Google and Youtube. The ad revenue generated on it is approximately $113 billion, with a CTR (click-through rate) of 0.90% and a conversion rate of 9.21%.
Ads on marketplaces have a higher chance of reaching a wide audience as most people are there. Here is how:
- With robust algorithms and analytics, it can reach the target audience quickly.
- It will help generate brand awareness.
- It will help garner traction and traffic.
- You’ll find the highest retail ROAS (Return on Ad Spend).
- Faster results.
- It is affordable.
Types of Facebook (Meta) Ads
Before going in-depth, it is essential to know the formats that can help sell your product and instantly catch the viewers’ attention:
1. Image Ads
An image that conveys the message while grabbing attention can help your ad campaign. Today’s people want a quick and easy way to learn about brands, products, etc. So, make fancy yet informative images that will make the user click.
Here is how it looks:

2. Video Ads
Videos are another way to promote your products. Short and informative videos are the recipe for a good advertisement.

3. Carousel Ads
Up to ten images or videos can be displayed in a single Facebook carousel ad. Each image has its link. This can make the customer opt for the service they are looking for.

4. Instant Experience
An instant experience is a great way to graphically showcase your company, goods, or services on mobile phones.
5. Poll Ads
These are types of ads where the audience answers a poll based on the image or video ad. It is a two-option poll and mainly happens on mobile devices.
6. Collection Ads
Ads that run on mobile devices where the customer can easily see and buy products. The user does not have to exit the Facebook app.
7. Slideshow Ads
A quick and affordable solution to capture the attention of the customer. It is similar to carousel ads, where the customer sees a carousel of video ads on their mobile phones.
8. Dynamic Ads
These ads focus on the interests of the customers. They enable companies to market specific products to customers who are likely to be interested in them.
9. Stories Ads
Like reels, these story ads appear on mobile screens in between a chain of stories. They can instantly catch the attention of the user.
10. Messenger Ads
Ads pop up in the chat option where the customer can directly reach your brand and services.
11. AR (Augmented Reality) Ads
Customers can interact with a brand with the help of filters and animations. This is a new type of advertising on Facebook.
| Bonus: Read how to run Facebook ads for ecommerce businesses & How to Optimize Facebook Ads |
Prerequisites to Run Facebook Ads for Shopify
Before we dive deep, it is crucial to have your accounts set up and software ready to roll. Here are the things that you need to kickstart your ad campaign:

Let’s unpack the prerequisites to run Facebook Ads for Shopify in detail:
1. Facebook Business Page
Firstly, you need to create a Facebook Business Page. It is like a personal account, except it helps advertise your products and builds connections with the target audience. Here is how you can create it:
- Login, then navigate to Pages > Create New Page.

- Name your Page and fill in the fields – category and bio.
- In the category, you tell the customers what kind of products and services you sell. For eg, clothing, pet apparel, toys, etc. In the bio section, you write about your store and describe what you do.

- Once that is done, click on Create Page. You should receive a success message.

- Now, fill up your contact details, email address, location, and location hours. Click Next.
- Add profile and cover pictures. Fill in all the details and invite people (optional). After all this, click Done. Your page shall be created. Also, you can check the health of your account while creating it.

2. Meta Business Suite
Meta Business Suite is where you can integrate your business data and Facebook marketing activity in one place. This can quickly and successfully give your team members, partners from other organizations, and vendors access to assets.

- Create your business manager account by clicking on ‘Create An Account.’
- Fill up the name of your business, your name, and your business email address.
Once this page appears, it is time to create your Facebook Ad Account.
3. Facebook Ads Account
Also known as a Meta Ads Account, you run your ads with it. It falls under your business manager account. To create it, follow these steps:
- Go to Business Settings. Locate Accounts > Ads Accounts.

- On the top right, click on Add Ad Accounts. On that, click Create a New Ad Account.

- Give your ad account a name, select the time zone that suits you and currency. Click Next.
- You’ll reach a ‘summary of changes’ page. Read the terms, accept them, and click on ‘create Ad account.’
- When it comes to assigning the account, choose your own Facebook account and take the full control option unless otherwise.
Now, we will move to Facebook Pixel.
4. Facebook Pixel
Facebook Pixel (Meta Pixel) is a code snippet that helps optimize, calculate, retarget Facebook ads, and customize the target audience for your ad campaigns. You analyze and evaluate customers’ interaction with your ads and website.
There are two ways to set up Facebook Pixel on your Shopify account –
- Using the Facebook & Instagram Sales Channel
- Using a Facebook Pixel App & directly tracking events on Shopify
| Further Reading: Learn how to create custom audiences and use them to create Meta Lookalike Audiences. |
I. Using The Facebook & Instagram Sales Channel
Follow the steps to set it up:
- Navigate to the Data Sources section on Meta Business Suite.
- A Pixel name will appear. You can choose to change it. Click on Continue.
- Now, choose ‘Set up Pixel now.’ You’ll see a lot of options appear.
- Since you are a Shopify partner and want to integrate your store, choose ‘Add code using a Partner Integration.’ In that, select Shopify.
- It will ask you to connect your Shopify store – go to your Shopify store > Online Store under Sales Channels > Preferences.
- Scroll down and locate Facebook Pixel.
- Click ‘Set up Facebook.’ Add it to your Sales Channel.
Note: For this step, ensure you have installed the Facebook & Instagram App from the Shopify App Store, and is set up on your sales channel. You can see the installation process below.
- Now, you have to ‘set up your shop’ –
- Connect your Facebook account.
- In Business Assets, choose your store and connect.
- Connect your Business Manager Account. Choose the audience preference – conservative, enhanced, and maximum.
- In Data Sharing, connect your Facebook Pixel.
- Agree to terms and conditions and submit for review.
- Your shop on Facebook will be under review. Meanwhile, you can run your ads on Facebook.
- Return to Meta Business Suite. Check the ‘I have completed the setup Shopify’ box and proceed to verify.
- To verify if your Pixel is working, copy and paste your website’s URL. This may take some time to get active. Click next and finish.
- Add people and assets.
- Ensure your domain is verified, and check how you want your customers to take action and view your ads.
II. Using A Shopify Facebook Pixel App
Another straightforward method to create and add Facebook pixels is by using a pixel app. Shopify offers a variety of apps that can generate and run a pixel for Facebook which helps track ad conversions in real time.
One such app is AdNabu’s Facebook Pixel app, which syncs your pixels to your Shopify store and generates the pixel code within the app, which can be easily added in the Customer Events section. The best part about this app is you don’t need to learn hard coding skills, and adding the pixel takes less than a few minutes!
Here is how the app can help you –
- Removes the hassle of fitting the pixel in the website’s theme.
- The app is free of cost.
- It generates pixel code based on the events (customer activity) you fetch.
- Add the code once; no further editing is required.
- Enables advanced matching (for purchase & initiate checkout events) & Conversion API (for purchase events).
- Quickly connects your pixels on Facebook to Shopify in just a couple of clicks.
Linking your Shopify account with the app is quick & can be done in 3 simple steps –
- Install the app from the Shopify app store. Connect your Facebook business account with your Shopify admin.
- After connecting the two, on the app’s homepage, you will see all your pixels appear in a dropdown. If you do not see them, click the refresh button on the right side of the dropdown menu. If you haven’t created any pixels, go to Events Manager and create one. The newly created pixel will appear in the app.
- Enable the pixel, add events, and copy the script generated below, and paste it into Customer events in the Shopify admin settings.
There are several other apps that serve the same purpose – creating and running the Facebook Pixel. You can read about them here.
Get Accurate Facebook Ads Conversion Tracking For Your Shopify Store with Meta & Facebook Pixels by AdNabu!
1-click, reliable Shopify Facebook Pixel installation.
Server-side tracking through CAPI.

Detailed analytics for all conversions synced accurately with your Events Manager account.
5. Campaign Setup
An ad campaign comprises multiple sets of advertisements designed to achieve a singular goal, like generating potential leads. The campaign is where you set your ad campaign and run it.
Now that we have ticked all the prerequisites, it is time to know what ways can be used to run ad campaigns on the platform.
| Further Reading: Create ad campaigns on Instagram and learn how to grow your small business on Instagram. |
2 Ways to Run Facebook Ads for Shopify
Here are the 2 ways on how to run Facebook Ads for Shopify Store.
1. Facebook & Instagram App By Meta
Facebook and Instagram app by Meta helps sell and advertise your products on two marketplaces – Facebook and Instagram. It lets you promote products and provide various marketing tools. It gives you information on your customer behavior, improves ad performance with a conversion pixel, easily connects all the accounts you need for running your ads, and automatically syncs up with your Shopify store.
Here is how you can install the app to your Shopify admin:
Step 1: Marketing Set Up For Shopify
- Go to the Marketing section on your Shopify admin.
- Choose Create campaign > Facebook audience building ad.
- Choose Set up Facebook and install the app.
Step 2: Install the Facebook & Instagram App from Shopify App Store
- Go to the Shopify store and install the app.
- Add it to the sales channel.
- Set up your account and start the setup – Provide payment and store details, and link your Facebook account.
- In the ‘Manage Facebook & Instagram data sharing preference,’ choose your preference.
- Accept the terms and conditions and save it.
Step 3: Connect Your Facebook Account(s)
- Choose Set up in Facebook Marketing, under Facebook & Instagram by Meta.
- Then, click on connect to link your Facebook account. If you do not have one, then you can click on ‘Create new.’
- Now, connect your business manager account, Facebook ad account, and Facebook Page for advertisement.
Step 4: Connect Facebook Pixel
- In the data sharing level, connect your Facebook Pixel.
Note: There are other ways to add the Facebook Pixel to your Shopify store, such as using dedicated Shopify Facebook Pixel apps.
Step 5: Choose a Facebook Target Country
- Select the country where you want to target your Facebook ads. Finally, click Finish Setup.
Since we have installed the app, it is time to create and run our ad campaign.
Running Ad Campaign
- On Facebook Business Manager (Meta Business Suite), go to All Tools > Advertise > Ads Manager.

- Before creating an ad campaign, ensure that your Facebook account is confirmed and a payment option is selected. After clicking Ads Manager, go to Account Overview (on the left panel) to check.

- Go to Campaigns (on the left panel) and click on Create.

- After you click on Create, this will pop up:

- Choose the objective of your campaign and set a name. Then, move to Ad Sets on the left side.

- Click on New Sales Ad Sets and name it. Then, choose what type of conversion you want. Set the budget, your target audience, locations, detailed targeting, and more.
- Now, go to New Sales Ad. This is where you will create an ad that your audience will view.
- Change the Ad Name and check if the right Facebook account is linked.
- You can either manually upload or choose media from the Catalogue. Also, choose the type of ad format that you’ll publish.

- You can create more ads with the Ad Sets by duplicating them.
- Now, if you want to upload the ad you have made on a graphic design tool like Canva or Adobe, go to Ad Creative section and upload your images, carousel images, videos, etc.

- Click on Ad Preview to get a glimpse of how your ad will look to the audience.

- In the Destination section, paste the product URL from the Shopify store. For that, navigate to Products on your Shopify Partner account > Product Dashboard > Select the Product and scroll down to ‘Search engine listing’ and copy the product URL from there.
- You can duplicate the ad to create more such ads and then change them at Ad Creative.
- Finally, click on Publish and your ad will go live.
2. Using A Product Feed Management App On Shopify
Using a feed management app can be quick. For this reason, AdNabu has brought a quick solution for running your ads. You can integrate the Facebook & Instagram Marketplace with it. The app offers a variety of functions like customizable feeds, opting in/opting out products, blocklisting, and more.
Let’s see how you can integrate the marketplace with it:
Step 1: On the app, locate Marketplaces
Go to the Marketplaces section on the AdNabu app and choose Facebook & Instagram Feed.

Step 2: Locate the Default Country and Language
On that, check if the Facebook & Instagram Feed is enabled. Then, check the countries and languages you wish to add. You can even edit the UTM parameters.

Make the changes you want, and then hit the Save button.
Step 3: Scroll down and locate the Data Feed URL.
After you save the changes, you’ll notice a Data Feed URL below Orders. Copy the link and paste it on your Meta Commerce Manager.

Step 4: Go to Meta Commerce Manager
Locate Catalog and then choose the Data Sources tab. In the Add Items section, select Data Feed.
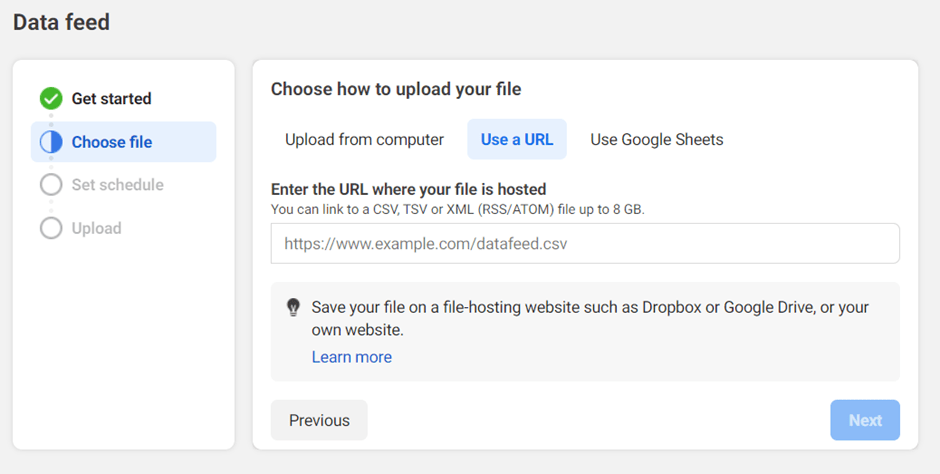
From there, go to Choose File and click Use A URL. Enter the URL you copied from the app. Click on Next, and you’ll reach Set Schedule. Once you set the schedule, save the feed and upload it.
| Also Read: How Much Do Instagram Ads Cost? |
Bonus Way: Using A Facebook Ads App On Shopify
There are other Facebook Ads apps that serve the purpose well:
| App | Features | Pricing | Trial Period |
|---|---|---|---|
| AdScale AI | – Fast AI-ads builder – Create Ad copy with AI – BI-Analytics – AI optimization for ads | Starter: $129/month Basic: $229/month Growth: $229/month | 14-day free trial |
| Optily | – Manage budget on Shopify dashboard – Instantly connect with Google Ads and Meta Ads – Supports all ad types | Free | Free throughout |
| Easy Ads for Facebook Ads | – Performance tracking dashboard – AI optimization for ads – Targeting and retargeting to the right audience | Basic: $39.95/month Pro: $59.95/month | 7-day free trial |
| Also Read: Best Shopify Facebook Product Feed Apps. |
How much does running Facebook Ads For Shopify cost?
This area depends on three factors – CPC (Cost per Click), CPM (Cost per Mille), and CPL (Cost per Lead).
- CPC – It is an online ad revenue model in which the advertiser pays for every ad click.
- CPM – Also called cost per 1,000 impressions (ad views), it is another way to generate revenue where the advertiser pays a specific amount per 1,000 impressions.
- CPL – It evaluates the efficiency of your ad campaigns in terms of generating fresh leads.

According to Shopify, clicks cost $0.94, while impressions cost $12.07 per 1,000. Cost per click (CPC) and cost per mille (CPM), sometimes called cost per 1,000 impressions, are measures that Facebook uses to charge advertisers. The average CPC advertising on Facebook is much cheaper when compared to other marketplaces.
Also, an average Facebook ad CPL (Cost Per Lead) costs $5.83. However, this might be significantly reduced if you correctly target your audience.
If you are looking for ways to cut down on the cost, follow these tips:
- Focus on retargeting to the right audience.
- Create relevant campaigns.
- Make the post-click experience worthy and easy.
- Limit the ad frequency score.
| Exploring TikTok ads? You might also want to read: How to Run TikTok Ads for Shopify: Step-by-Step Guide |
Final Thoughts
In summary, follow the abovementioned steps, and the task will feel manageable. These two methods can simplify ad management on Facebook. You’ll reap benefits by raking in profits and generating sales.
Facebook is a great marketplace to advertise your products. Its feature, Ad Creative, can help your target audience to grasp your ads easily.
FAQs
What do I need to start advertising on Facebook?
Before you start advertising on Facebook, you need to have a Shopify store. Then, you must have – a Facebook Business Page, Business Manager Account (now called Business Suite Account), Facebook Ad Account, and Facebook Pixel and enter information about your product on the Campaign. It is also crucial to know what each account does, what the terms conversion, campaign, retargeting, etc., mean.
How do I connect my Shopify store to my Facebook Ads account?
To connect your Shopify store to my Facebook Ads accounts, you need to log into your Shopify account first. Then, install the Facebook & Instagram channels to your Sales Channel. Set up the Facebook Marketing section and give access to the Facebook Page, Facebook (Meta) Ad Account and Business Suite. Next, add the Meta Pixel to your admin on Shopify.
This way, you will finally connect your Shopify store with your ad account.
Can I run Facebook Ads without Business Manager?
Yes, it is possible to run ads without a Business Manager by using your ad account only. However, things become simpler as you can access everything easily on your Business Manager – insights, analytics, managing pages, segregating accounts, and reaching a wider audience get convenient.
If you do not wish to have one, you can also use your personal Facebook account or just your ad account to run ads. But this can be tedious if you wish to expand to a larger audience or have a big organization.
What is the difference between Facebook Ads Manager and Business Manager?
Facebook Ads Manager focuses on smaller teams or businesses and looks after managing, reviewing, and creating ads. It is limited in terms of permissions and user roles. Its major focus is on handling and managing ads.
On the other hand, Business Manager looks after several assets and manages permissions. It works well for large businesses and integrates with many Facebook assets and accounts. It functions like a dashboard where you can access and track properties necessary for an ad campaign.
Do I have to sync my entire product feed to Facebook to run ads?
No, you can choose specific products for your Facebook catalog that you want to run ads for. Ensure you select those products from your product feed on Shopify. If you are using a product feed management app, you can do the same.
How do I sync my product feed to Facebook?
There are two ways to sync your Shopify product feed to Facebook –
The first one is by using the feed URL on your Shopify admin account. To use this, go to Products > Export. After clicking Export, you will see all the available exports. Navigate to the RSS Feed and copy the feed URL (in the feed URL section).
The second way is to use a product feed management app and generate a specific feed URL for Facebook itself. AdNabu allows you to export your feed with the guidelines and specifications needed for a Facebook catalog.
Check Out These Related Blogs:


