

Facebook (Meta) is the dominant social commerce platform in the United States, and the numbers make that clear. 46% of online shoppers name Facebook their preferred social network for making purchases. This highlights the potential of selling on the platform and points to a growing market ready for businesses to tap into through Meta ads and other social commerce features.
However, to use these features and show your products to Facebook’s vast audience, you need to master the art of creating and managing a Facebook Product Feed.
Now, you might be wondering what Facebook (Meta) product feeds actually are and how to create them. This blog explores what they are, why they are important, and how to create them. We will also learn how to optimize these feeds, ensuring you’re well-equipped to engage with millions of potential buyers!
Understanding Facebook Product Feeds
Let’s have a look at these feeds in detail.
What Is a Facebook Product Feed?
A Facebook product feed is a structured data file that contains detailed product information, used by businesses to showcase products across Facebook. It helps display product listings accurately for shops and Dynamic Ads. This feed typically includes attributes such as:
- Product names
- Prices
- Images
- Descriptions
- SKUs (Stock Keeping Units) or Product IDs
- Availability status
Types of Facebook Product Data Feeds
The basic idea behind Facebook (Meta) product feeds stays the same, but their formats can differ. The common formats include:
- XML Feed: Suitable for complex product data. It’s machine and human-readable and a popular format in the e-commerce landscape.
- CSV Feed: It works like a text-based Excel sheet, simple for retailers, which uses commas to separate data.
- JSON Feed: A newer, lightweight format for web apps. It’s easy to read, write, and parse.
- API Integration: Allows real-time data through API for changing inventories.
- RSS Feed: Used for updated info, also fits product listings for new launches or deals.
Your choice of format will depend on what the particular ad ty needs and what you can manage.
Why Online Sellers Need Facebook Product Feeds
There are a few key reasons you should use product feeds:
- Multi-Channel Selling: This lets you list items across various platforms without manually inputting data for each product.
- Efficient Advertising: You can set up Meta Advantage+ Catalog Ads (previously dynamic ads) on platforms like Facebook. These ads show your products to interested customers automatically.
- Up-to-date Information: A single product feed ensure any changes like price updates are shown everywhere instantly. Having updated product feed is more crucial than ever especially in the case of Meta Advantage+ Catalog ads. These types of ads showcase products to the right audience based on real-time browsing behavior, intent and purchasing history. For these ads to yield effectively results, product feed must consistent and current. It should be free of errors, incorrect pricing, mismatched product details, etc.
In essence, a well-managed product feed can improve your ad placement, keep your data accurate, and help you sell on Facebook more effectively.
With that, let’s learn how to create a Facebook (Meta) Product Feed. And that starts with inventory setup.
| Also Read: Best Facebook Ads Apps For Shopify. |
Preparing Your Inventory for a Facebook Product Feed
Getting your inventory ready for a Facebook (Meta) Product Feed means making sure you have all the essentials in place. Your aim is to refine your product listings to meet Facebook’s standards. Follow these steps to get started:
Requirements for a Facebook Product Feed
Setting up your feed means including certain details and choosing a file format. Formats can be XML, CSV, TSV, XLS, TXT, or JSON. Make sure to include these Facebook Product Feed Specifications:
- ID: Every product needs a unique identifier. And you should follow the 100-character limit.
- Title: Product titles should be clear and include relevant keywords. This makes them easier to find and more appealing. Plus, the title should not exceed 200 characters.
- Availability: Shows if an item is available. Keep this updated to reflect your inventory accurately. Update stock status accurately, using “in stock” or “out of stock”
- Condition: Indicates if the item is new, refurbished, etc. Being clear about the product’s condition sets the right expectations.
- Product Description: Provides details on features and benefits. Write engaging descriptions to highlight what makes your product special without exceeding the 9,999-character limit.
- Images: They should be high-quality and represent the product accurately. Choose images that are clear and follow Facebook’s guidelines. Ensure images are in JPEG or PNG format, at least 500 x 500 pixels, and under 8 MB.
- Price: Lists how much the product costs. Ensure your pricing is accurate to avoid customer confusion.
- Category: Helps in organizing products for easy searchability. Use specific categories to improve findability.
- Brand: The brand name of the product. This should be maintained within 100 characters.
| Pro Tip💡: Use custom labels. These can help in organizing your products. For example, you can segment by sales, making it easier to highlight promotional items. Plus, you can also use them to test various marketing strategies, like different keywords or image styles, to see what performs best. |
Facebook Product Feed Examples
- This is an example Facebook Product Feed in CSV format. The details are explained above.

It can be downloaded here.
- This is an example Facebook Product Feed in XML format.

- This is an example Facebook Product Feed uploaded via Shopify.

Importance of High-Resolution Product Images
High-resolution images help attract customers and drive sales through your Facebook product catalog. These images should:
- Be visually appealing and professional to capture users’ attention.
- Accurately represent the products to set clear expectations for buyers.
- Comply with Facebook’s image guidelines to ensure they are displayed correctly on the platform.
Tip: You can also consider using user-generated content (UGC) for authenticity and social proof.
| Also Read: Best Shopify Instagram Product Feed Apps. |
How to Create a Facebook Product Feed — Step by Step
You can create a Facebook product feed in two ways: using Facebook Business Manager (FBM) or Meta Commerce Manager. Each serves different needs and offers unique features. Understanding these differences can help you choose the right tool:
Facebook Business Manager offers simplicity. It’s perfect for businesses that want to quickly get their products onto Facebook and Instagram without needing in-depth e-commerce functionalities. Ideal for:
- Quick catalog creation and sharing
- Basic sales and advertising on Meta platforms
Meta Commerce Manager goes deeper, offering advanced e-commerce features. Ideal if you want:
- Detailed tracking with Facebook Pixel
- Regular product feed updates and data management
- Advanced e-commerce functionalities within the Meta ecosystem
So, based on your preferences, you can choose one of the two accordingly to create your Facebook product feed. One by one, let’s learn how it can be done.
Setting up your product catalog in Facebook Business Manager
- Open Business Settings in your Business Manager.

2. Select ‘Data Sources’ and then ‘Catalog’.

3. Choose ‘Add’, followed by ‘Create a new catalog’.

4. Name your catalog and select your item type.
5. Click ‘Create catalog’ to finalize.

Tip 💡: It’s recommended to keep all items in one catalog for simplicity.
After creating your catalog:
- Assign access to people in your Business Manager if needed. You can select ‘Create ads’ or ‘Manage catalog permissions’.
- If no one else needs access, click ‘Cancel’ to skip this step.
Note: Connect Meta pixels or app SDKs if you have them. This is optional and can be set up later.
Once done, visit Commerce Manager to add and manage your catalog items. This streamlined approach helps you effectively showcase your products on Facebook.
This is just one method to create your product feed. Another easy option is using Meta Commerce Manager, which is great for promoting products on Facebook and Instagram.
| Also read: Auction vs Reservation Ads on Facebook. |
Setting up your product catalog in Meta Commerce Manager
Before You Begin:
- Ensure you have a Facebook Page for your business.
- Create a business portfolio in Business Manager to manage your catalog effectively.
Note: The Meta business account, sometimes called a Business Manager account, is being renamed to business portfolio. This change will appear gradually across Meta technologies.
- Creating a Catalog:
- Go to Commerce Manager.
- To start, if you’re new and don’t have a catalog, click Get Started, then Create a catalog, and Get Started again.

- If you already have a catalog, you’ll see them listed. Click + Add catalog to make a new one.
- Choose the type of products you sell and click Next.
- For e-commerce:
- To manually add items, select Upload product info.
- To import items from a partner platform, select Connect a partner platform, choose the platform, and follow the steps to import your items.

- Assign the catalog to your business portfolio, ensuring you have full control over it.
- Name your catalog and click Create.
Once this is done, we will have to add items to the catalog. And there are several methods to do the same. Let’s learn more about them in the next section.
Different Ways to Add Items to Your Facebook Product Catalog
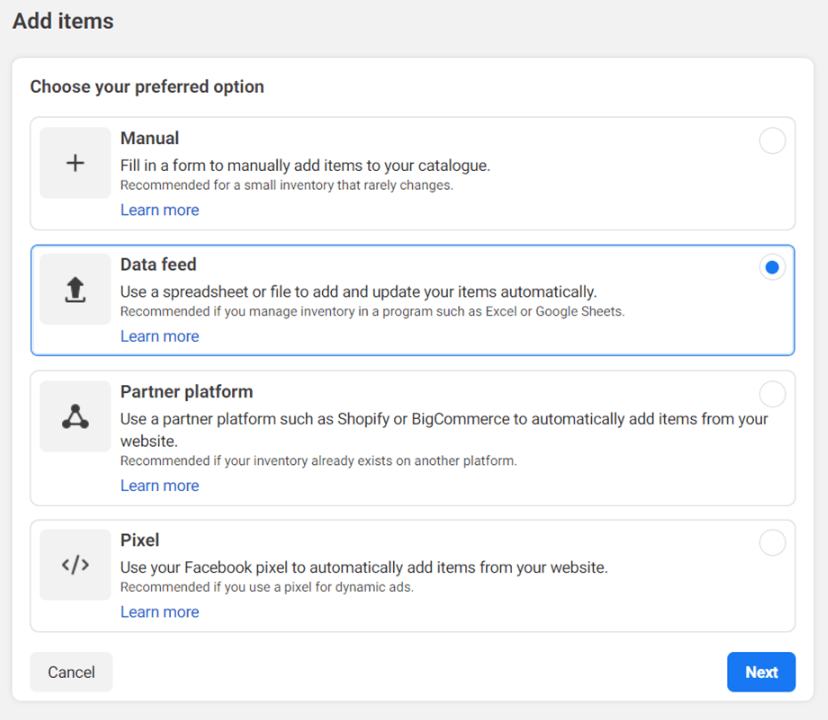
To upload your product feed to Facebook using Meta Commerce Manager, you have three main options, each suited to different business needs:
Manual Upload
- First go to Meta Commerce Manager: Navigate and select your catalog.
- Manual Entry: Go to the ‘Catalog’ tab, then ‘Items’, and click ‘Add items’. Choose ‘Add multiple items’ and select ‘Manual’.
- Detail Input: Input product details into the form, including images (JPEG or PNG, minimum 500 x 500 pixels, maximum 8 MB), name, description, and other relevant details. This method is recommended for catalogs with fewer than 50 items, offering a straightforward way to individually list products.
Data Feed
- Prepare Your Feed: Create a file in an accepted format (XLSX, CSV, TSV, XML, or Google Sheets) that includes all necessary product fields.
- Upload Process: In Commerce Manager, under ‘Data sources’, choose ‘Add items’ and then ‘Data feed’. You can either upload directly from your computer or use a URL for scheduled updates.
Note: For creating a Facebook data feed URL easily, you can leverage Shopify apps like AdNabu. Learn how here.
Using Meta Pixel
- Setup: Requires installation of the Meta Pixel on your website. Ensure the Pixel is tracking each product page view through the PageView event.
- Integration: In Commerce Manager, link the Pixel under ‘Data sources’ by selecting ‘Add items’, then ‘Pixel’. Follow the prompts to connect.
- Automatic Updates: The Pixel automatically adds new items and updates existing ones in your catalog based on user interactions on your website. This method is complex but effective for dynamic inventories, needing technical setup to install microdata tags.
This method dynamically updates your catalog based on website interactions and is best for businesses with frequently changing inventories.
| Note: In case you’re seeking an effortless way to use Meta Pixel for tracking and ad targeting, consider AdNabu’s Facebook Pixel app. It makes the Facebook pixel installation process simple, ensuring accurate tracking of conversions and interactions on your site without the need for complex setups. It’s especially useful for dynamically updating your product catalog in Meta Commerce Manager based on user activity. And the best part, the app is free! |
With that, let’s look at the partner integration method.
Adding Items to Your Facebook Product Catalog through Partner Platforms
If you already host your items on a partner platform that has an integration with Meta, you can import items to your catalog in Commerce Manager. You can then continue to manage your items on your partner platform, and any updates will automatically sync to Commerce Manager.
Starting with Shopify, let’s learn what the process will be to send those products to the Meta Commerce Manager.
Shopify to Facebook
Basically, to do this, there are two methods. One uses the Sales Channel app, and the other one using a product feed management app like AdNabu.
Sales Channel Method
To link Shopify with Facebook and Instagram, follow these steps:
- Open your Shopify dashboard to find ‘Sales Channels’.
- Search and add ‘Facebook and Instagram’ under Sales Channels.
- Click ‘Connect your account’ after adding the app.
- Follow instructions to set up shop features and ads.
- Agree to terms to complete setup and start selling.
This connection will allow you to sell products and also to create Facebook ad campaigns and gain valuable insights.
Additionally, syncing collections from Shopify to Facebook is straightforward, but you can manage collections directly in Facebook’s Commerce Manager for more personalized product presentations.
Always make sure your data-sharing settings are optimized for the best performance by enabling pixel and Conversions API, aiming for Enhanced or Maximum data sharing.
AdNabu for Shopify Merchants
AdNabu is a specialized Shopify product feed management app that helps merchants improve their marketing efforts. For the Facebook marketplace, it creates precise and compliant Data Feed URLs that fit neatly in Facebook’s Meta Commerce Manager, where users can then create their ads with AdNabu’s optimized feeds.
AdNabu has the prestigious “Built for Shopify” badge, indicating its dedication to upholding Shopify’s high standards.
Plus, it isn’t just limited to Facebook (Meta); it offers data feed URLs for other platforms, such as Google Shopping, Instagram, X (Formerly known as Twitter), Pinterest, Snapchat, Bing Shopping, and TikTok.
To use AdNabu and send your Shopify products to Facebook, you need to:
- First, access the Marketplaces section within AdNabu and select the option for Facebook and Instagram Feed.

2. Specify your default country and language to customize your feed accordingly.
3. Customize UTM Parameters, such as the source, medium, and campaign.
4. By clicking on “Enable and Save” AdNabu generates a unique Data Feed URL for your Shopify store.

5. Copy the generated Data Feed URL and use it as a data source within your Meta Commerce Manager.
If needed, you can regenerate your Data Feed URLs by clicking on the “Refresh” button in AdNabu.
Adding the Data Feed URL to Meta Commerce Manager involves a few more steps:
- Look for data sources tab under the catalog section.
2. Under the “Add Items” section, choose the Data Feed option to proceed.
3. When prompted to “Choose file -> Use a URL” input the URL you copied from AdNabu.

4. After entering the URL, click on “Next” to set a schedule for how often Meta updates your feed. Finally, save your feed settings and start the upload.
And that’s it.
Bonus: Check out this blog on the best Facebook product feed apps for Shopify! Inside it, you will find more such apps that can help you take your Shopify products to Facebook (Meta).
With that, let’s now look at the process for adding items from WooCommerce to Facebook (Meta).
WooCommerce to Facebook
To send your WooCommerce products to Facebook, you can follow these steps:
- Install the Facebook for WooCommerce Plugin: Go to Plugins > Add New in your WordPress dashboard, search for Facebook (Meta) for WooCommerce, and install and activate the plugin.
- Set Up the Plugin: After activation, go to WooCommerce > Settings > Integration > Facebook for WooCommerce. Click ‘Get started’ to connect your Facebook account and follow the setup wizard.
- Connect Your Facebook Assets: The setup wizard will prompt you to log in to Facebook and connect your Business Manager, Facebook Page, Ad account, Pixel, and Catalog. Make sure you have Two-Factor Authentication enabled for your account.
- Configure and Sync Your Products: Once connected, you’ll be able to configure settings such as product syncing. The plugin automatically syncs your WooCommerce catalog to your Facebook catalog, making your products available on your Facebook Page Shop and for creating product-based ads.
- Manage Product Sync Settings: In the plugin settings, you can manage how your products sync to Facebook, including options to exclude certain categories or tags and choose whether to use the short or full product description.
Tip 💡: Remember, this plugin also allows you to track ad performance with the Facebook Pixel and chat with customers via Facebook Messenger directly from your store. Keep the plugin updated to ensure compatibility and access to the latest features.
Uses of Facebook Product Feed
Once you have a Facebook (Meta) product catalog with you, you can use it in different ways to
Facebook marketing strategy. These ways include:
- Meta Advantage+ Catalog Ads: These ads display products tailored to the users’ interests. They show items based on what users like or view online.
- Collection Ads: These use the Facebook (Meta) product feed to present product collections attractively. These ads aim to engage users by showcasing several products together.
- Carousel Ads: So, these ads allow users to swipe through various products, along with their different links. This format is engaging and can lead to multiple conversions within one ad.
- Ads with Product Tags: This category of ads links directly to products from the feed. They provide essential details like price, making shopping easier for users.
- Collaborative Ads: In this setup, a merchant shares a part of their product catalog with a brand. The brand can then use this selection to create Advantage+ catalog ads for direct sales initiatives. This allows for more targeted and effective marketing efforts!
Adding to this, you can also create a shop on Facebook for your business using a Facebook product catalog. This shop will act as a digital storefront where products from the feed are displayed. Customers can browse and shop directly on Facebook or Instagram, offering a seamless shopping experience.
How to Optimize Your Facebook Product Feed
Creating a feed is just the first step. To get the most out of it, you need to keep it optimized. Here are the key things to focus on:
- Use correct product identifiers like GTINs or MPNs wherever applicable.
- Fill in all required fields, including title, description, price, availability, and condition accurately.
- Optimize product titles by keeping them under 65 characters, in title case, and free of promotional text.
- Use high-quality images in JPEG or PNG format, at least 500 x 500 pixels, and under 8 MB.
- Group product variants correctly using the item_group_id attribute.
- Highlight sale prices using the sale_price and sale_price_effective_date fields.
- Use internal labels to organize and filter product sets for targeted ads.
- Update your feed regularly so Meta always displays accurate pricing and availability.
For a deeper look, check out our detailed guide on how to optimize Facebook product feeds.
Final Thoughts
Through this guide, we learned about the importance of Facebook Product Feeds, including the different methods to create and optimize these Facebook Product Feeds .
By applying all the strategies you have learned today, you can easily showcase your products to millions of potential buyers, enhance visibility and engagement on the platform, and capitalize on the opportunities that social commerce presents to us.
Good luck!
FAQs
- How can I create a Facebook Product Feed?
To create a Facebook Product Feed, use either Facebook Business Manager or Meta Commerce Manager. In Business Manager, go to ‘Data Sources‘ > ‘Catalogs‘ > ‘Add‘, select ‘Create a new catalog‘, name it, choose your item type, and click ‘Create catalog’.
- How do I upload my Facebook Product Feed?
To upload your feed, manually enter product details in Commerce Manager, upload a file in formats like XML or CSV, or use a direct link for automatic updates.
- Why is optimizing my Facebook Product Feed important?
Optimizing your feed improves product visibility, ad relevance, and sales conversion rates.
- Can I add products manually to my Facebook Catalog?
Yes, you can manually add products to your Facebook Catalog through Commerce Manager, which is ideal for smaller inventories.
- What can I use my Facebook product feed for?
You can use your Facebook product feed for many Facebook marketing strategies. These include creating Meta Advantage+ Catalog Ads and starting a Facebook shop. You can also retarget users who visited your site earlier. Plus, you can display your products in ad formats such as Carousel Ads and Collection Ads.
- Can I sell products directly on Facebook through my Shopify store?
Yes, Shopify store owners can create a Facebook shop that’s completely synced with their store. This allows you to sell products directly on Facebook, with inventory and prices automatically updated in real time. Shopify’s Facebook app is recommended for setting up your Facebook shop.
- What are the benefits of linking my product catalog to the Facebook Pixel?
Linking your product catalog to the Facebook Pixel collects user interaction data, which is essential for effective Retargeting with Meta Advantage+ Catalog Ads on Facebook.
- How often should I update my Facebook Product Feed?
Update your Facebook Product Feed regularly, such as daily or weekly, to keep your catalog updated with the latest products and prices.
- Are there any specific formatting requirements for the Facebook Product Feed?
Yes, your product feed must adhere to Facebook’s strict formatting rules and contain a set of required fields such as ID, name, description, link, image link, availability, and price. Refer to Facebook’s support documentation for detailed formatting guidelines.
Other Helpful Blogs on Facebook from AdNabu:


