
Whether you’re a small business or an established brand on Shopify, you’re likely here to harness the power of Snapchat ads and the Snapchat feed. These ads and feeds offer a vast array of opportunities, enabling businesses to tap into their robust and dynamic nature.
Advertising on Snapchat offers several perks for analyzing and tracking your target audience. These perks also help create marketing strategies and refine the existing ones.
All these can be accessed with the help of Snap Pixel, a piece of code that helps target your ad campaigns and track customer activities.
Now, if you’re wondering, “How to install Snapchat Pixel on Shopify?” to reap these benefits, you’re in the right place! This blog will walk you through everything you need to know about adding Snapchat Pixel to Shopify and leveraging its capabilities to supercharge your advertising efforts on Snapchat.
So, without further ado, let’s dive into the world of Snap Pixel and unlock its potential for your Shopify business!
Table of Contents
What is a Snapchat Pixel?
The Snapchat Pixel, also called Snap Pixel, is a tool offered by Snapchat at no cost and designed to assist business owners in monitoring the performance of their advertisements.
It comes as a code snippet (written in JavaScript) inserted into the online store’s website. This helps track Snapchatters’ interactions, such as page view, add to cart, checkouts, duration on different pages, etc., as they navigate the online store.
Benefits Of Adding Snapchat Pixel
Using the pixel helps E-commerce businesses in several ways –
- Offers Improved Ad Targeting – With the pixel, you can precisely reach the right audience and accurately track their activity. This helps create a strategy to increase conversions and sales by fine-tuning the campaigns.
- Conversion Tracking – It is easier to estimate the exact number of customer conversions.
- Audience Insights – You get better insights into your target audience. Based on the data, you can set custom audiences and even retarget your ads to existing customers who have shown interest in your brand.
How To Install Snapchat Pixel On Shopify: Step-by-Step
Before installing the Snap Pixel, ensure you have set up the following –
Snapchat Business Account –
A Snapchat business account lets you access all the features needed to market your products. Your business account creates a ‘Business Profile’ for your brand and a landing page for customers who wish to learn more about your products.
It’s easier to add pixels if you have a business account.
Snapchat Ads Account –
Pixel is easy to set up if you have an ads account. You can access all your ad campaigns, billing data, and ads manager.
Snapchat Ads Manager –
This is where you add your pixel and manage your ad campaigns. It’s the hub for creating, updating, and monitoring the performance of your campaigns.
Shopify Admin Access –
It’s essential to have admin access on Shopify in order to edit and add the pixel code to your Shopify store’s backend. You must also have your product feed ready to link them with your Snapchat Ads Manager.
If you haven’t connected the two, you can try AdNabu’s data feed URL feature to instantly sync your product feed.
Now that you have set up the aforementioned accounts, let’s start Snapchat pixel setup.
Add Snapchat Pixel to Shopify
Step 1: Go To Events Manager
- From the dropdown on the top left, select Events Manager under Assets. Select New Event Source and give your pixel a name.
- In ‘Set Up Web Events,’ select Snap Pixel.
- Next up, select the necessary integrations and continue creating a pixel. Choose the one that fits your requirements.
Step 2: Select Funnel Events
- Choose the funnel events you wish to track.
- Next, select the parameters you wish to collect data from.
- As you add parameters, notice the preview code next to it change on the basis of the selected parameter.
- Ensure automated matching is enabled.

Next Step: Copy The Code & Add To Your Website
The pixel is set. It’s time to delve into the installation process.
You can install snapchat pixel on Shopify in two different ways –
- Manually adding Snap Pixel to the Shopify store
- Using Shopify Snap Pixel apps
Let’s explore both methods of installing snapchat pixel on Shopify in detail –
Method 1: Manually Adding Snapchat Pixel To Shopify Store
After creating the pixel, visit Events Manager and select a pixel you wish to add to your Shopify website.
Note: You can also access this part in the ‘Pixel’ under the Assets section as long as your ads account is connected.
After selecting the preferred pixel, reach the Event Source Setup and copy the code.

Copy the base code. Then, open your Shopify admin.
Under the sales channel, go to Online Store > Themes. Now, locate your current theme. In that, notice the three dots ‘…’ and select ‘Edit code’

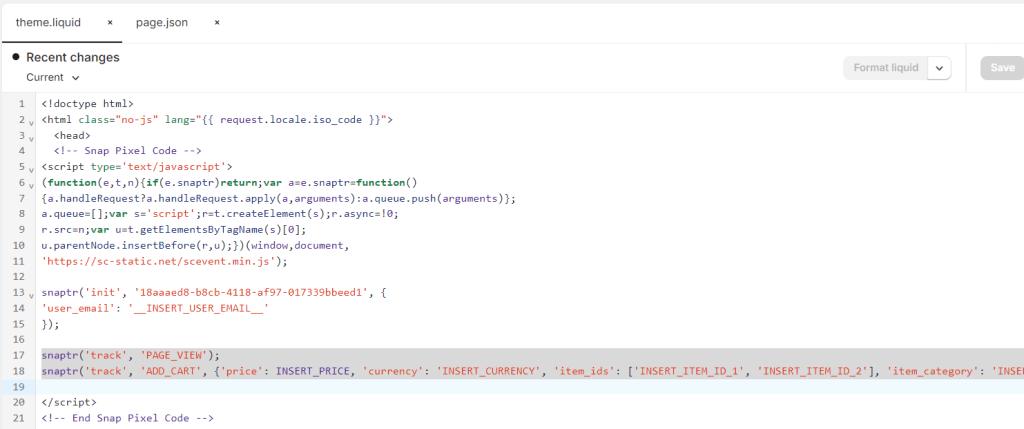
After selecting it, locate theme.liquid. Add your copied base code to the theme.liquid file under the <head> tag. It will look like this –
Next, if you wish to add more events, scroll down to the ones you generated by adding parameters.
These are events that you’ll be adding for necessary tracking. These fit here in the code; notice the highlighted section –
If you have created separate pages for separate events, add these functions accordingly in those pages.
For more examples, you can check this help article.
Ensure that you save the changes.
Your snap pixel is set! Now, we’ll focus on the next method – using Shopify Snap Pixel apps.
Method 2: Using Shopify Snapchat Pixel Apps
Another method is by installing Shopify apps that help generate the pixel within the Shopify admin or offer a simpler method of adding the pixel. These apps can be easily integrated into your admin account and let you track events and manage your pixel.
Let’s explore some of the prominent apps in detail –
1. Snapchat Ads
Rating: ⭐⭐⭐⭐⭐(4.7/5)
Snapchat offers its own app called Snapchat Ads; it is free to install (asks for a payment method while linking your business account) and is used to create and manage all your ads in one place. This app also runs Snap Pixel without adding the code to your Shopify’s theme file.
Here is how you can set it up and use it –
Step 1: Install the app from the Shopify app store
Go to the Shopify app store and download the app. For the app to run, ensure you have set the following –
- A Snapchat account
- A Business account
- An ads account
- A payment method
Once the app is installed, link the aforementioned accounts and follow the steps the app asks you to fulfill.
Step 2: Connect Pixel with your Shopify store
On Shopify admin, go to the ‘Data Sharing’ section –
It will ask you to enter your Pixel ID. To do this, return to your business manager on Snapchat and navigate to Assets > Pixels. All the pixels will be displayed.
Select the pixel you want to track and copy its ID –
The highlighted part is your pixel ID. Copy it and paste it into the data sharing field of the Shopify admin.
Then, click ‘Set up Pixel.’ Your pixel is up and ready to run.
This method runs the pixel in the backend without adding the additional code to your store’s theme.
Other apps for Snap Pixel that you can try –
2. Omega – Multi Snapchat Pixel
Rating: ⭐⭐⭐⭐⭐ (5/5)
Omega enhances Snap tracking with the help of Conversion API. It offers server-side tracking that safeguards your online store from any kind of data loss and follows top tracking standards for maximum performance and better return on ad spends (ROAS).
Features:
- Easily installs multiple pixels without the code.
- Offers premium data collection with a turn-key server-side tracking solution.
- Customizable tracking for optimum results.
- Integration with Conversion API.
Pricing:
- It offers a 3-day free trial.
- Charges $4.99/month.
3. SnapX – Snapchat Pixel Manager
Rating: ⭐⭐⭐⭐⭐ (4.7/5)
SnapX helps boost the effectiveness of your Snapchat ads. Installing and tracking pixel events such as page views, adding to carts, checkouts, etc, is easy. The app lets you quickly add pixels in a few clicks and offers a fast and precise integration.
Features:
- Quickly tracks essential conversion events.
- Helps build an audience based on precise tracking.
- Easy to set up pixels in a few clicks.
Pricing:
- It offers a 7-day free trial.
- Charges $4.99/month.
Next Step: Snap Pixel Verification
It’s crucial to check whether your pixel is running. For this, we shall cover how to verify your pixel and successfully track your campaign events.
1. Using Snap Pixel Helper
You can test your pixels by downloading the Snap Pixel Helper. It is a Chrome extension that helps configure your pixels and troubleshoot any issues that arise during implementation.
After installing it, test your pixels to see if they are firing correctly. The extension prompts different icons, each having a different meaning as explained –
-
 This is the default state. It means that no pixels were detected. Ensure your ad blockers are off. If that does not work, check your setup for any bottlenecks.
  This means the pixel is functioning and detecting.
  This denotes the pixel events are being tracked successfully.
  It is alerting you with warnings.
Test Parameters –
Login to the extension and test the PAGE VIEW parameters. Some basic info like your email, phone number, or coded versions of them (hashed email or phone) will be sent. This is how it looks when a hashed email is not passed:
To test the PURCHASE event, ensure that the price, currency, and transaction_id parameters are being passed –
Note: For error messages, follow Snapchat’s documentation.
2. Testing Events On Snapchat Ads Manager
If you want to test out the events in real-time and track how a customer’s action will be recorded, you can conduct test events on the Events Manager. This is another method to verify if your pixels are running and helps you understand how the customer’s actions will be tracked and how the data is generated.
Follow these steps to implement the test –
- Go to Snapchat Ads Manager. On the top-left, click the ▼ dropdown menu. Locate Events Manager under Assets.
- Then, on the right side, click Test Events. Under it, select the data source –

- Enter your website’s URL in the ‘Test browser events’ section.
- Test the events by triggering actions on your website. For example, click ‘add to cart’ and test if the add to cart event is being generated in the Events Manager.
- You can also view the number of times an event was generated and check its metadata for more information.
After taking action (the purchase event, for example) on your website, here is how the events will be generated –

This is how you can verify whether your events are generating.
Another thing to keep in mind is you can access the Diagnostics page by selecting a pixel or visiting the overview section. It explains the health of a particular pixel. It consists of the following –
- Install Snap Pixel Helper
- Basic Event Setup
- User Parameters Setup
- Automated Matching
- Implementation Issues
The aforementioned elements provide an in-depth analysis of the pixel and notify you about any warnings.
What Is Event Quality Score (EQS)?
When running Snap ads, it is important to know if your ads are reaching the right audience. To track this, Snapchat offers Event Quality Score (EQS), which is essentially a rating that informs you how well your ad campaigns are doing and if your potential customers are responding to the parameters (customer details and identity signals) well.
A higher EQS suggests that your ads reach more Snapchat users who will likely take the desired action. This can lead to more conversions at a lower expense.
Here is how EQS is calculated –
The data quality is rated on a scale of 1 to 10 for each event and source integration. This score applies to different types of events (like page views or purchases) and sources (like Pixel or MMP). It’s based on three key factors:
- The types of customer details received.
- The quality of those details.
- The percentage of events that include these details.
Bonus: How To Use Snapchat Pixel After The Setup?
After deploying the Snap Pixel, there are several things you can do to run optimized ad campaigns –
1. Create Custom & Lookalike Audiences
Pixel gives you insights into the audiences who have shown interest in your brand – by viewing an ad during the awareness stage, clicking the ad, exploring your website/snap profile, making a purchase, etc. Based on these events, the pixel is able to track and create a custom audience to which you can send your ads.
Another thing you can do is create lookalike audiences. These audiences have interests similar to your target audience, making it easier to create ad campaigns targeting them.
2. Use Advanced Tracking
Track specific actions users take on your site, like browsing certain product categories or reaching the payment page, to get detailed insights. When tracking purchases, focus on value-based metrics to understand your return on ad spend (ROAS) and figure out which products or categories are making the most profit from Snapchatters.
3. Retarget Ad Campaigns
Pixel allows you to create ad campaigns and retarget them to the customers who have shown interest in your brand, directly or indirectly. Retargeting increases the chances of conversions and helps boost your return on ad spends (ROAS).
4. Utilize For Real-Time Insights
Pixel offers real-time insights into the events generated. Based on these event insights, creating strategies for your ad campaigns and improving their performance is easy.
5. Use Pixels To Create Dynamic Ads
If you’re a store owner with large inventories, creating dynamic ads that show more relevant products to interested customers is easier.
Don’t stick to simple ad campaigns; opt for dynamic ones for a more customized experience for the customers.
6. Improve Website Experience & Conversion Rate
The data can help improve your website pages with high bounce or low conversion rates. Improve the UX of your site for a better user experience.
Apply A/B testing to improve your landing pages and other aspects of your ads and website.
Conclusion
Now that you know how you can utilize Snap Pixel to optimize your ad campaigns, your advertising journey will sail smoothly. It will get easier to track events and formulate a strategy to improve further campaigns.
So, it’s time to take your Snap ads game to the next level. Let pixel take charge to boost your ads’ reach and skyrocket your Shopify business to new heights!
FAQs
What is the Snapchat Pixel and why should I install it on my Shopify store?
The Snapchat Pixel is a piece of code that you can install on your Shopify store to track the effectiveness of your Snapchat advertising campaigns. By monitoring the actions visitors take on your website, the pixel allows for detailed analytics, ad targeting, and optimization towards specific goals, such as purchases or sign-ups.
Are there any apps available to create a Snapchat Pixel for my Shopify store?
Yes, there are several apps that can be integrated to run a Snap Pixel for your Shopify store. To name a few, they are – Snapchat Ads, Omega – Multi Snapchat Pixel, SnapX, and Civil Pixels. These apps reduce the extra labor of adding code to your theme files. They quickly integrate with your Shopify store and simultaneously track customer events.
How do I create a Snapchat Pixel?
To create a Snapchat Pixel, you need to log into your Snapchat Ads Manager, navigate to the ‘Events Manager’ section, and click on the ‘Pixels’ tab. From there, you can create a new pixel by clicking the ‘Create Pixel’ button and following the prompts.
Where can I find the Snapchat Pixel code to install on my Shopify store?
After creating your Snapchat Pixel in the Snapchat Ads Manager, you will be provided with a piece of JavaScript code. This is the pixel code that you will need to install on your Shopify store. It can be found under the ‘Pixels’ tab in the ‘Events Manager’ section.
Can I install the Snapchat Pixel on Shopify without coding knowledge?
Yes, you can install the Snapchat Pixel on your Shopify store without needing extensive coding knowledge. Shopify provides a straightforward way to add custom JavaScript codes like the Snapchat Pixel through its theme editor or settings for third-party integrations.
How can I verify that the Snapchat Pixel is properly installed on my Shopify store?
After installing the pixel, you can use the Snapchat Pixel Helper, a browser extension available for Chrome, to verify that the pixel is firing correctly on your Shopify store. It will show you real-time pixel firing and report any errors or issues.
What events can the Snapchat Pixel track on my Shopify store?
The Snapchat Pixel can track a variety of events, such as page views, add to carts, purchases, and sign-ups. These events help you understand user behavior on your site and optimize your Snapchat ad campaigns accordingly.
How do I customize the Snapchat Pixel events for my Shopify store?
Customizing Snapchat Pixel events requires modifying the pixel code to include specific event tracking parameters. This might involve a bit of coding knowledge or hiring a developer, especially for complex customizations beyond basic event tracking.
What are the best practices for using the Snapchat Pixel on Shopify for new customer acquisition?
Best practices include regularly checking your pixel status with the Snapchat Pixel Helper, using tracked events to create targeted ad campaigns, and analyzing the data collected by the pixel to refine your advertising strategies for better ROI.
Can I use the Snapchat Pixel data for retargeting visitors on Snapchat?
Yes, the data collected by the Snapchat Pixel on your Shopify store can be used to create retargeting campaigns on Snapchat. By targeting ads to users who have previously visited your site, you can increase conversion rates and attract new customers more effectively.
Check Out These Related Articles:


